
how-to make a hot cocoa kit

HOW-TO MAKE A HOT COCOA KIT
by Destri of The Mother Huddle
There just isn't much that a three year old can create that isn't something only a mother would love. I thought and thought about what my little boy could make his friends for Christmas and finally came up with a Hot Cocoa Kit. Over the course of a week we worked on little projects to add to the kit, and I can't tell you how much fun we had with it. He got to mash things, melt things, sprinkle things, dip things, fill things....all sorts of sensory play. He is so proud of himself and can't wait to give them out. Plus I got to take some fun pictures, form some lasting memories, and scratch everyone off his list. Including his teacher, friends and the party favors for our Christmas party. All for less than twenty dollars!
If you find your kids getting restless for the big day to arrive this would be a great project to tackle until it comes.
HOT COCOA KIT
You may choose to only add one or two elements to the kit, but I will give you a list of what we used.
Supplies:
• hot cocoa
• almond bark or chocolate chips
• candy canes and sprinkles
• coffee creamer, cinnamon, nutmeg
• plastic spoons
• marshmallows
• mug
• various containers and baggies to package
I have learned that my son has a max attention span of about fifteen minutes. If I expect him to focus on anything longer than that, it always ends up not as fun for him. So we did these projects on different days, at a time of day that I knew he could focus.
I would have everything out and ready before I even called him in the room. After showing him what we were doing I tried my hardest to just let him do it his way. I was amazed at how concerned he was with how everything looked!
Chocolate and Peppermint Spoons
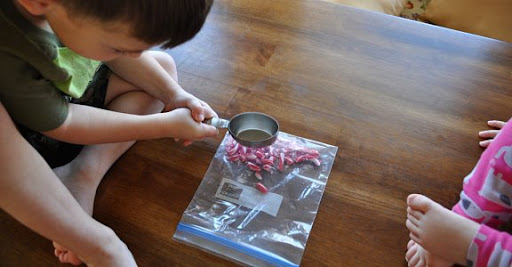
I found that with most of these projects, sitting on the table was just the easiest. For the spoons I broke up a couple candy canes and put in a plastic bag. Then with his sister there to supervise, he went to town breaking them up. While he did that I melted the chocolate.

I then told him to just scoop up a little chocolate and then set the spoon on the wax paper. Even my two year old helped with this.
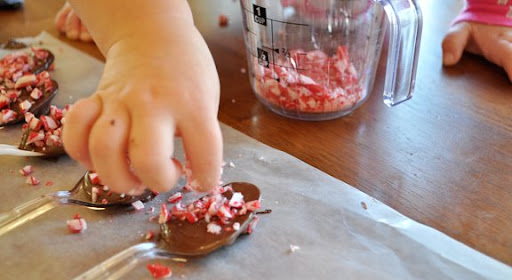
Then I had them sprinkle on the candy cane.
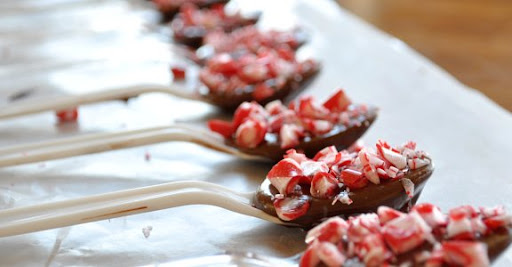
All done, and they did an awesome job! Onto the next project.
Chocolate Dipped Canes With Sprinkles
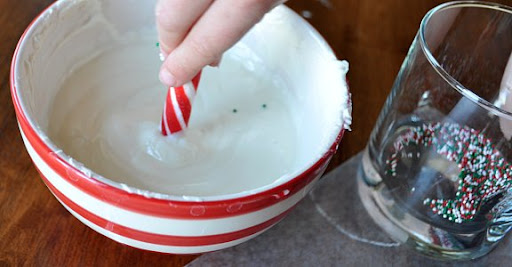
I had the chocolate melted and the sprinkles already in a glass for him when we started this. Again sitting on the table, I had him dip the candy canes.

Then place them on wax paper, and sprinkle on the candies.
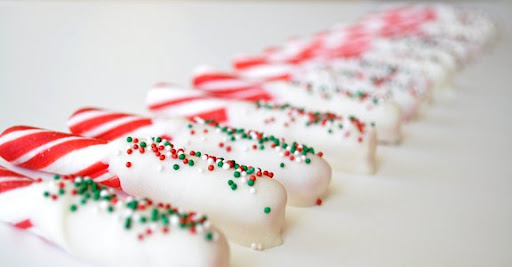
Again, so impressed with how careful he was! And then I took a bajillion pictures of them. There is something about candy canes, they're just photogenic ya' know?
Nutmeg & Cinnamon Creamer
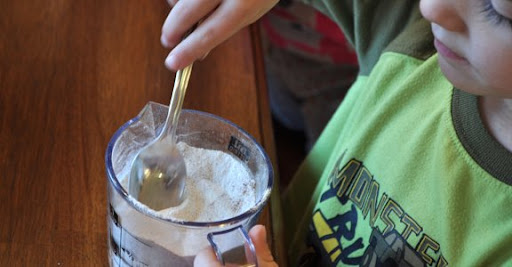
For this I just added a little cinnamon and a dash of nutmeg to a measuring cup and let him mix it up.
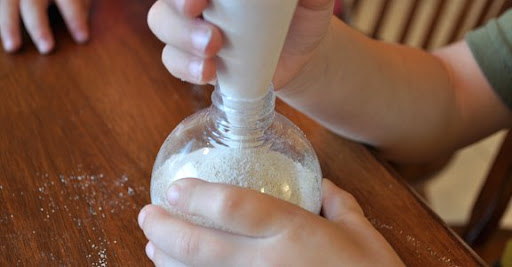
Then I helped him make a funnel to pour it into the fun little bulbs.
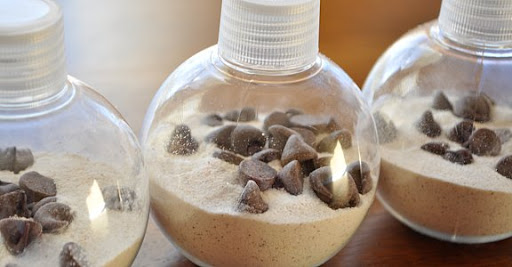
It was his idea to add the chocolate chips, you can never have too much I suppose.
Marshmallow Bags

This project was really easy. Just lined him up with some marshmallows and let him fill up the little bags. He was a little stingy on the marshmallows. He finally told me "mom, we have to save me some!"
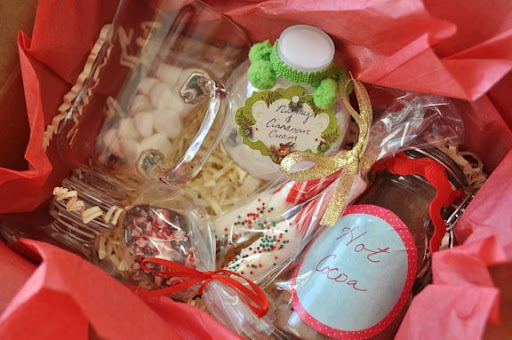
Packaging It All Up
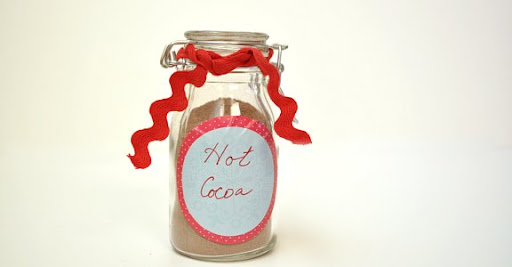
I picked up these cute little jugs at Hobby Lobby on sale for 75 cents. I had him help me fill them up then I added a the rick rack and label.
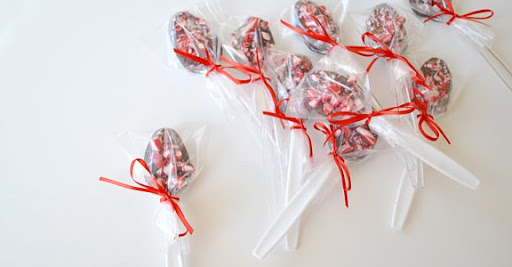
The spoons and candy canes were wrapped in a little bag and tied with ribbon.
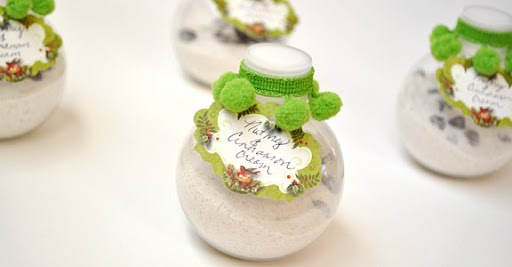
I tied a tag to the bulbs and then using double sided tape added the fun pom poms to the top.
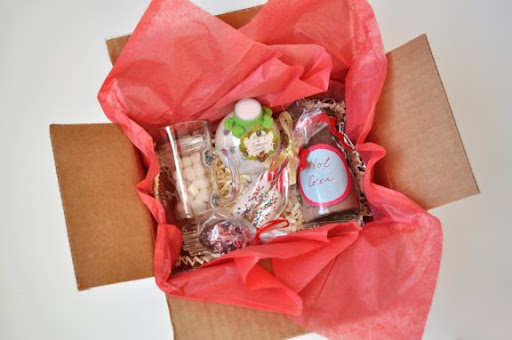
Then put it all in a box with the mug he insisted on, "cause they're fancy mom", that I bought at Ross for $3.99 for four. All done!
For his teacher we added a little instant coffee to the mix and a note.
For the party favors I just added a few packets of hot cocoa instead of the jug, and put it all in a cellophane bag minus the mug.
There you have it! A fun way to get your littlest ones creating, and keep 'em busy. This really was a fun project for my kids, and I learned that I have underestimated their abilities when it comes to these types of projects. I won't hesitate in the future!
view the entire how-to series archives for tons of tutorials from readers like you.
"Do not let what you cannot do interfere with what you can do." - John Wooden
![]()


17 comments:
Destri, what a fun (and uber patient) mom you are! My kids would have a hayday with this! Thanks for the great idea!
This is one of my favorite How-To's to date! Love the cute ideas!!
What a great idea. I love it! May I ask where you got the bulbs?
absolutely adorable. wish I had seen this before I made my cocoa gifts for the neighbors!
Thanks for sharing!
oh wow. what a great idea! thank you for posting this.
i love this idea!
These are so cute! I love your ideas.
Thanks everyone! I hope you have a chance to try it out.
Aylee Bits, I bought the little bulbs at Hobby Lobby, I wished I could remember where at in the store, but I do believe they were by the candle making and soap making stuff. They were not by the rest of the glass bottles, I asked someone for little plastic vials, and where they took me these cute little bulbs were. They were only 67 cents each and half off. Hope that helps!
Thank you so much Destri!
Its so fun seeing my dear Destri over here at Marta's place! Such a great project, love the nutmeg creamer balls!
What a cool spin on the hot cocoa gift. Mine never look this beautiful or delicious. LOVE that your 2 yr. old got to help. 10 Mom points for you! :)
Hi! We gave these little kits to our neighbors last year...minus the fancy mug. I love the creamer recipe and the way you packaged it all up. Really cute!
Ok, that's adorable! What a quick and cute gift idea, I love it :)!
This is just such a wonderful idea! Sometimes I feel people think if you give a homemade gift they assume you're being cheap, but so much love and care goes into something as detailed as this it would make anyone happy on christmas day! :)
What a fabulous kit to put together! Thanks so much for details and everything! :)
Adorable! One of the cutest ideas I've seen. Very creative.
What a great gift idea.
Post a Comment